The following sections describe how to use the XMEG system.
Two files run-xmeg.sh (*nix) and run-xmeg.bat (Windows) are contained in the top directory (See Directory Structure) of the software. Initially the admin user account login is set to username admin, password super.
Opening new media files: To open a new multimedia file first login into the system. Then from the 'File' menu select 'Open New Media'. Two choices are then displayed: to open 'By File' which will open a dialog box to browse for a file on your computer; or open 'By URL' which allows you to specify a URL to a file that may be located on another computer or on the Internet.
Opening saved metadata files: XMEG saves the metadata you defined for a multimedia file in a single .xml file. The XML metadata file will contain a reference to the media file so that when you open the metadata file the XMEG program can find the media file associated. To open a metadata file select 'Open Metadata File' from the 'File' menu. Select the .xml file you would like to open.
In both the above cases, after selecting a file a new 'Editor' and 'Viewer' window will be displayed. The Viewer window will display the media file, if it is a audio or video file then the Viewer will contain an audio/video player. The Editor window will contain a number of fields for entering metadata into the system. The Editor and Viewer are explained in detail in the next sections.
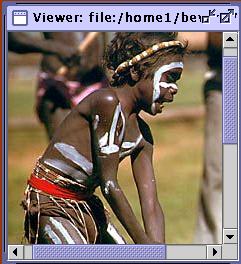
The Viewer window displays the multimedia file that either you have opened or associated with a XML metadata file you have opened. If the media file is a text or image file then the Viewer will display the file in a scrollable window (Fig 1a). If the media file is either a audio or video file then the Viewer will contain a audio (Fig 1b) or video player allowing you to play, stop, fast forward, rewind and adjust volume of the media file.
Fig 1a: Viewer displaying a image media file

Fig 1b: Viewer displaying a audio media file
The 'type' field records the type of media file: text, image, audio or video. The 'identifier' field contains a URL to the media file so that it may be located and displayed by the Viewer. These two fields are required and cannot be left blank or removed using the SchemaManager.
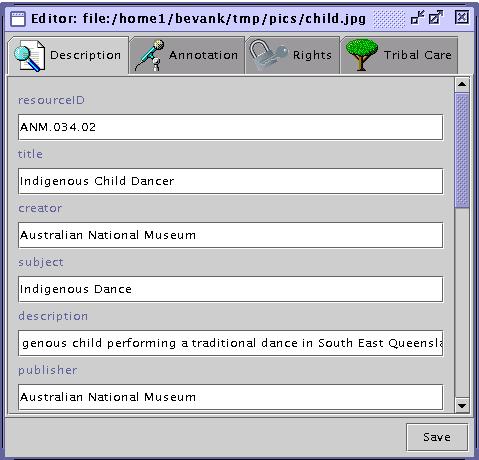
Fig 2: Editor: entering descriptive metadata
All users may add annotations to further describe a resource:
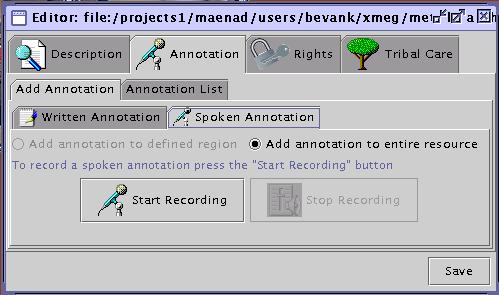
Fig 3a: Editor: adding a spoken annotation
You may also add annotation to a particular region or area of an image. To do this click and drag an area of the image in the Viewer. The "Add annotation to defined region" option button will then be unlock, select this option and add the annotation in the normal way. Figure 3b show an example of this:
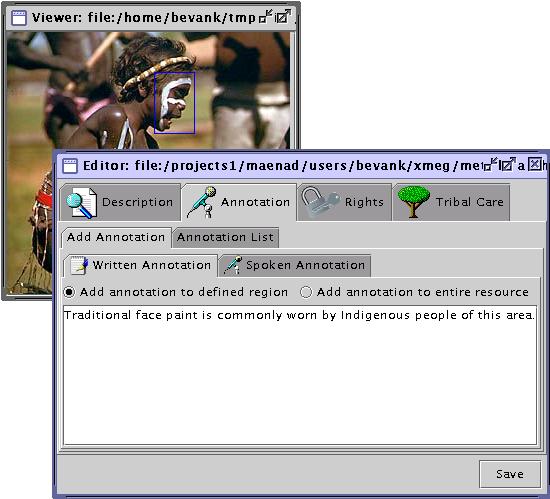
Fig 3b: Editor: adding a regional written annotation
The "Annotation List" tab (Figure below) is displayed when you open a resource that has annotations attached to it.
admin and owner users.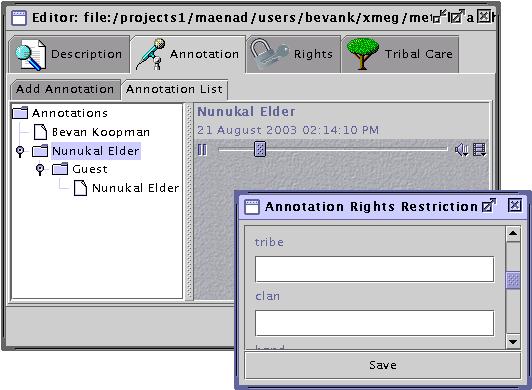
Fig 4: Editor: threaded annotations and annotation rights
The 'Rights' tab of the Editor contains restrictions regarding access to the particular resource. The example figure 5a below shows a resource that is restricted to only female users, who are either elders or initiated and belonging to the Nunukal tribe. Figure 5b shows that the resource is also restricted to members of the Oodgeroo family who are either artists, musicians or dancers. When this resource is opened by any user these requirements will be checked against the user's profile and the system will determine if they have sufficient permission to access the resource.
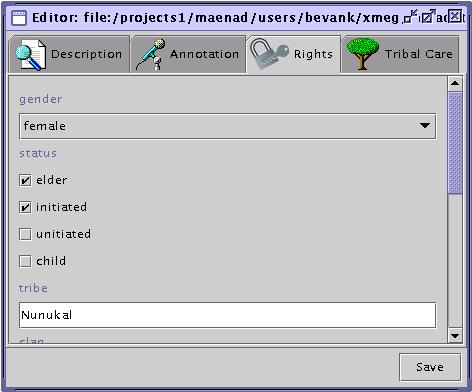
Fig 5a: Editor: entering rights metadata
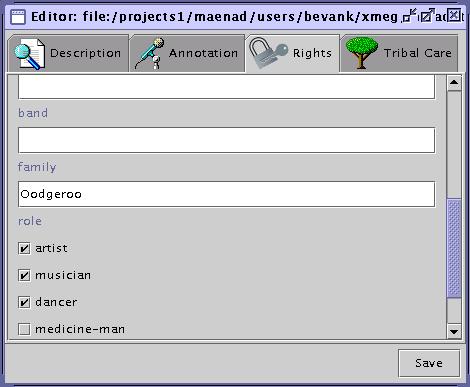
Fig 5b: Editor: entering rights metadata
The 'Tribal Care' tab of the Editor contains information specified by traditional owners about how to respectfully deal with the resource. This typically pertains to resources that are digital surrogates of physical objects.
The figure below shows three types of tribal care information: orientation, storage and preservation. These are the defaults that are initially set in the default schema. You may add or remove to suit your individual needs using the SchemaManager described in the final section of this manual.
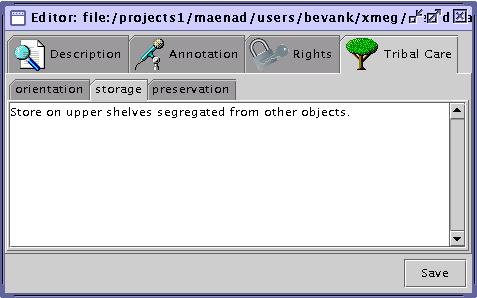
Fig 6: Editor: entering tribal care metadata
config.xmlThe ConfigManager provides a simple graphical tool that allows users to edit the configuration file from within the XMEG system. See the Configuration section for more information on the different configuration options. The ConfigManager is invoked by selecting 'ConfigManager' from the 'Admin' submenu of the 'Tools' menu. The ConfigManager can only be run by admin users.
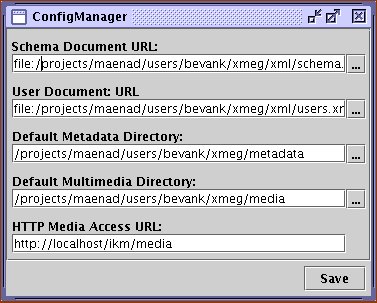
Fig 7: ConfigManager
The UserManager allows admin users to add new users to the systems, define user profiles and remove users from the system.
admin users.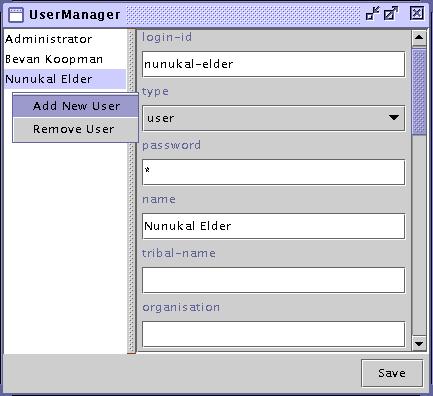
Fig. 8: UserManager
Schemas are used to define both the Resource and User Profiles. They allow users to customise the structure of the Resource metadata and User Profiles. By altering the schema users can specify which metadata fields should appear and what their semantics should be. The SchemaManager provides users with a graphical interface that allows them to do this. The SchemaManager is invoked by selecting 'SchemaManager' from the 'Admin' submenu of the 'Tools' menu. The SchemaManager can only be run by admin users.
When the SchemaManager is run a graphical tree representing the current schema file is created. The 'Load Schema' and 'Export Schema' allow you to export the current schema to an XML file and load other schemas that you may have defined. The currently loaded schema file is displayed as a URL at the top of the SchemaManager window. All schemas will have four main nodes that appear under the 'xmeg' root node:
user-profile: represents the attributes used to describe user profiles. The children of this node will be translated into the form for entering user details into the UserManager.descriptive: each child of this node will be translated into a entry in the 'Descriptive' tab of the Editor.rights: each child of this node will be translated into a entry in the 'Rights' tab of the Editor as illustrated in the figure below.tribal-care: each child of this node will be translated into a tab of the 'Tribal Care' tab of the Editor.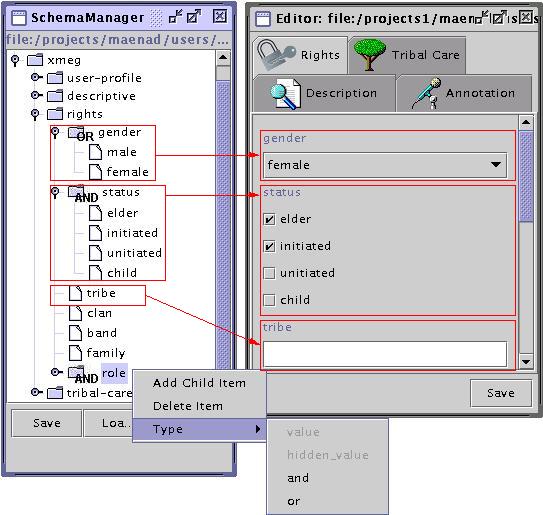
Fig. 9: SchemaManager and equivalent Editor rights tab
Nodes may be added and deleted by right clicking on them and selecting the relevant option from the popup menu. The 'Type' option allows you to set some specific options about the selected node:
admin users.Changes to the schema are only committed when you click the 'Save' button. You should close all open resources before running the SchemaManager.
^^[Back to Top] | [Back to contents]